
Does your yard turn into a pond after a heavy rain? You can stop your yard from flooding by implementing proper drainage solutions, assessing your yard’s grading, and making smart landscaping choices. This guide will walk you through effective strategies to manage water and keep your lawn dry and healthy.
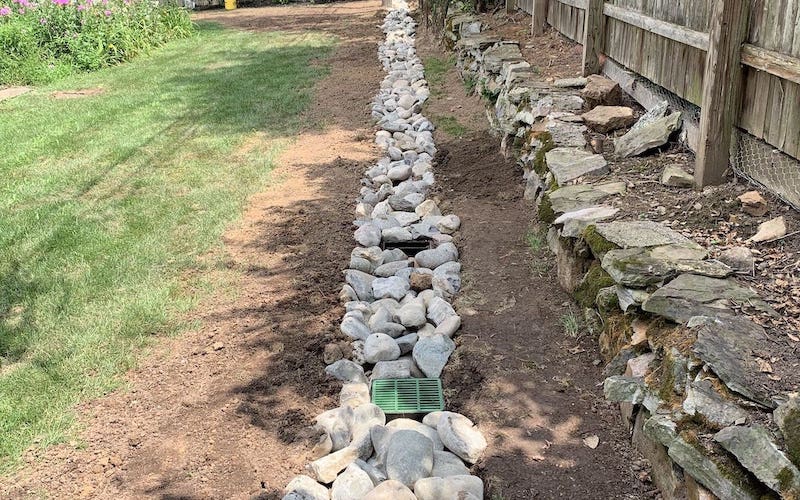
Image Source: hydroscapespa.com
Why Does My Yard Flood?
Flooding in your yard can happen for many reasons. It’s often a combination of factors that overwhelm your property’s ability to absorb or carry away water. Let’s explore the common culprits.
Natural Slopes and Low Spots
Your yard has a natural contour. If water flows downhill, it will naturally collect in the lowest spots. If these low spots are significant or if the slope directs water from neighboring properties onto yours, flooding is likely.
Soil Compaction and Type
The type of soil you have plays a big role. Heavy clay soil doesn’t absorb water well. It tends to become saturated quickly, leading to surface pooling. Similarly, if your soil is compacted, perhaps from heavy foot traffic or machinery, it can’t absorb water efficiently. This is where soil aeration can be a lifesaver. Aerating your lawn creates small holes, allowing water, air, and nutrients to penetrate the soil more easily.
Impermeable Surfaces
Hard surfaces like concrete patios, asphalt driveways, and even densely packed gravel don’t allow water to soak into the ground. Instead, they channel water directly into your yard, increasing the volume of water that needs to be managed.
Inadequate Drainage Systems
Sometimes, the problem is the lack of a proper drainage system, or a system that is clogged or too small for the amount of water it needs to handle. This includes issues with how rainwater is directed away from your home.
Heavy Rainfall and Poor Gutters
Modern storms can bring intense rainfall. If your gutters are clogged, damaged, or if your gutter downspout extensions are not directing water far enough away from your foundation, that water will pool around your house and saturate your yard.
Assessing Your Yard’s Drainage Needs
Before you can fix your flooding problem, you need to figure out exactly where the water is coming from and where it’s going. A good assessment will point you toward the best water management strategies.
Mapping Water Flow
Take a walk around your property during or immediately after a rain. Observe where the water collects.
- Where does it pool? Identify the lowest points.
- Where does it come from? Is it flowing from a neighbor’s property, a driveway, or just falling from the sky and not draining?
- How much water is there? Is it a gentle flow or a rushing stream?
This visual inspection is your first step in effective landscaping for drainage.
Checking Soil Permeability
You can do a simple test to see how well your soil drains.
- Dig a hole about 1 foot deep and 1 foot wide.
- Fill it with water and let it drain completely.
- Fill it again, but this time, time how long it takes for the water to disappear.
- If it drains within a few hours, your soil has good permeability.
- If it takes more than 12 hours, your soil likely has drainage issues.
This test can give you a good indication of whether soil compaction or a naturally poor-draining soil is the primary cause of your flooding.
Evaluating Existing Drainage
Look at your current drainage setup.
- Are your gutters clean and in good repair?
- Do your downspouts carry water away from the house? Are they extended?
- Are there any visible ditches or drains that are blocked with leaves or debris?
Effective Drainage Solutions for Your Yard
Once you know the source of the water and the problems, you can choose the right drainage solutions. Here are some of the most effective methods.
1. Grading Yard: Reshaping Your Landscape for Flow
One of the most fundamental ways to control water is by altering the land’s slope. Grading yard correctly means ensuring that water flows away from your home and towards a suitable drainage area.
The Importance of a Gentle Slope
The ideal slope is a gradual decline away from your house. A general rule of thumb is to have the ground slope away from the foundation at a rate of at least 1 inch per foot for the first 6 to 10 feet. This ensures that surface water moves away effectively without causing erosion.
How to Grade Your Yard
- Identify High and Low Spots: Use stakes and string or a landscape level to find areas that are too low or that hold water.
- Add or Remove Soil: You may need to bring in topsoil to build up low areas or excavate soil from high spots.
- Compact Properly: After adding soil, compact it to prevent settling, which can create new low spots.
- Seed or Sod: Once graded, re-seed or sod the area to protect the soil and prevent erosion.
Caution: Major grading projects might require professional help, especially if they involve significant earthmoving or impact neighboring properties.
2. French Drain: Subsurface Water Management
A french drain is an excellent solution for areas where water collects or where you have a high water table. It’s a trench filled with gravel and a perforated pipe that collects and redirects underground water.
What is a French Drain?
A french drain is essentially a trench containing a perforated pipe surrounded by gravel. Water seeps into the gravel, flows into the pipe, and is carried away to a lower point, such as a storm drain, a dry well, or a lower section of your yard.
How to Install a French Drain
- Plan the Path: Determine where the water needs to be collected and where it can be safely discharged. The trench should run downhill.
- Dig the Trench: Dig a trench about 12-24 inches deep and 12-24 inches wide. The bottom of the trench should have a slight slope (about 1 inch per 10 feet) towards the outlet.
- Lay Landscape Fabric: Line the trench with heavy-duty landscape fabric. This prevents soil from mixing with the gravel and clogging the pipe.
- Add Gravel Base: Place a 4-6 inch layer of coarse gravel at the bottom of the trench.
- Install the Pipe: Lay the perforated drainage pipe (usually 4-inch diameter PVC) on top of the gravel base, ensuring the perforations face downwards. Connect sections of pipe with couplings if needed.
- Fill with Gravel: Cover the pipe with another 6-12 inches of gravel.
- Wrap with Fabric: Fold the landscape fabric over the gravel to enclose it.
- Cover with Soil: Backfill the trench with the excavated soil, or add topsoil. You can then plant grass or ground cover over the top.
A french drain is a powerful tool for managing subsurface water and preventing it from saturating your yard.
3. Rain Garden: Nature’s Way of Handling Rain
A rain garden is a beautiful and environmentally friendly way to manage stormwater runoff. It’s a shallow depression planted with native plants that are tolerant of both wet and dry conditions.
How Rain Gardens Work
Rain gardens are designed to capture rainwater from rooftops, driveways, and other hard surfaces. The water slowly infiltrates into the ground, where it is filtered by the soil and plants. This reduces the amount of runoff that enters storm drains and helps recharge groundwater.
Designing and Installing a Rain Garden
- Choose a Location: Select a spot that receives runoff and is ideally located at least 10 feet away from your home’s foundation.
- Dig a Shallow Depression: The garden should be no more than 6-12 inches deep. The size depends on the amount of runoff you need to capture.
- Improve Soil: Mix sand and compost with the existing soil to improve drainage and aeration.
- Select Plants: Choose native, water-tolerant plants that thrive in your local climate. Many beautiful flowering plants and grasses work well.
- Add Mulch: Mulch helps retain moisture, suppress weeds, and maintain soil health.
A rain garden not only helps with drainage but also adds aesthetic appeal and provides habitat for local wildlife.
4. Permeable Pavers: Letting Water Through
Replacing traditional hard surfaces with permeable pavers is a fantastic way to reduce runoff from driveways and patios.
What are Permeable Pavers?
Permeable pavers are designed to allow water to pass through them and into the ground below. They are installed over a base of gravel and sand, which facilitates drainage.
Benefits of Permeable Pavers
- Reduces Runoff: Significantly decreases the volume of water flowing into storm drains.
- Improves Water Quality: Filters pollutants as water passes through the system.
- Aesthetically Pleasing: Available in many styles to complement your landscape.
- Prevents Puddles: Water drains away quickly, leaving surfaces dry.
While the initial cost can be higher than traditional paving, the long-term benefits for drainage and environmental impact are substantial.
5. Sump Pump Installation: For Basements and Crawl Spaces
While not directly a yard solution, a sump pump installation is crucial if your flooding issues extend to your basement or crawl space. Water that saturates the ground around your foundation can seep into your home.
How Sump Pumps Work
A sump pump is installed in the lowest part of your basement or crawl space, in a pit called a sump pit. When the water level in the pit rises, the pump automatically activates, pumping the water out and away from your house through a discharge pipe.
When to Consider a Sump Pump
- If your basement or crawl space frequently floods.
- If you have a high water table.
- As a backup measure for heavy rainfall events, even if you don’t currently have flooding.
Ensuring your sump pump is properly installed and maintained is a vital part of comprehensive water management for your home and yard.
6. Gutter Downspout Extensions: Directing Water Safely
This is one of the simplest and most cost-effective drainage solutions you can implement. Your gutter downspout extensions are critical for moving water away from your foundation.
Why Extended Downspouts Matter
Gutters collect rainwater from your roof. Downspouts carry this water down to ground level. If the downspout simply dumps water right next to your foundation, it will saturate the soil there, leading to potential basement flooding and yard saturation.
Best Practices for Downspout Extensions
- Length: Aim to extend downspouts at least 5-10 feet away from your house.
- Slope: Ensure the extension slopes away from the house so gravity carries the water further.
- Discharge: Direct water onto a sloped area of your yard, into a rain garden, or connect it to underground drainage pipes that lead to a storm drain or a safe discharge point.
- Type: You can use flexible or rigid extensions, or even bury corrugated pipe underground to carry the water further away.
Regularly check that your downspouts are clear of debris and that the extensions are functioning correctly.
7. Soil Aeration: Improving Water Absorption
As mentioned earlier, compacted soil is a major contributor to yard flooding. Soil aeration is a process that loosens compacted soil by creating small holes.
Benefits of Aeration
- Improved Water Infiltration: Water can penetrate the soil instead of running off.
- Better Air Circulation: Roots can access oxygen.
- Enhanced Nutrient Uptake: Nutrients can reach the root zone more easily.
- Reduced Thatch Buildup: Helps break down dead grass.
How to Aerate
You can rent a core aerator (which pulls out small plugs of soil) or spike aerator. For smaller yards, a manual aerator can be used. Aerate when the soil is moist but not waterlogged.
8. Rain Barrels: Capturing and Reusing Water
While not a direct flooding solution, rain barrels help manage water volume by collecting rainwater from your roof.
How Rain Barrels Help
By collecting water, you reduce the amount of runoff that flows into your yard and storm drains. The collected water can then be used for irrigation, reducing your reliance on municipal water.
Placement and Use
- Place rain barrels under downspouts.
- Ensure they are on a stable, level surface.
- Overflow spouts should direct excess water away from your foundation.
9. Swales and Berms: Natural Water Diversion
Creating gentle mounds of earth (berms) and shallow ditches (swales) can redirect water flow across your property.
How Swales and Berms Work
- Swales: These are shallow, broad channels that follow the contour of the land to slow and redirect surface water. They can be planted with grass or groundcover.
- Berms: These are raised mounds of earth that can be used to block water flow or create channels where water can be directed.
These features are part of thoughtful landscaping for drainage and can be incorporated into a more naturalistic design.
10. Dry Wells: Underground Water Storage
A dry well is an underground pit filled with gravel that collects and slowly releases surface water.
When to Use a Dry Well
Dry wells are effective for managing water from downspouts or localized drainage problems. They are often connected to a perforated pipe.
Installation Considerations
- The pit should be large enough to hold the expected volume of water.
- It should be lined with landscape fabric to prevent soil infiltration.
- It needs an outlet for the water to dissipate into the surrounding soil.
Combining Solutions for Optimal Water Management
Often, the most effective approach to stopping yard flooding involves a combination of these strategies.
Case Study: A Yard in Need
Imagine a yard with a slight slope towards the house, compacted clay soil, and downspouts that dump water right at the foundation.
- Grading: The first step would be to re-grade the yard to create a positive slope away from the house.
- Downspout Extensions: Extend the downspouts at least 10 feet from the house.
- Soil Aeration: Aerate the entire lawn to improve soil permeability.
- French Drain: If water still collects in a low spot, a french drain can be installed to intercept and redirect it.
- Rain Garden: A rain garden can be placed at the end of the french drain or downspout extension to absorb the collected water.
This multi-pronged approach ensures that water is managed at every stage, from falling on the roof to soaking into the ground.
Maintaining Your Drainage System
Once you’ve implemented drainage solutions, regular maintenance is key to ensuring they continue to work effectively.
Regular Inspections
- Gutters and Downspouts: Clean them at least twice a year, or more if you have many trees. Check for damage or blockages.
- French Drains: Periodically check the outlet for any debris that might be blocking flow.
- Rain Gardens: Weed and prune plants as needed. Ensure the infiltration area isn’t becoming clogged.
- Permeable Pavers: Sweep or vacuum them annually to remove debris that can clog the pores.
Seasonal Checks
- Fall: Clear leaves and debris from gutters and around drainage areas.
- Spring: Inspect all systems after winter thaw and heavy rains.
Frequently Asked Questions (FAQ)
Q1: How much does it cost to fix yard flooding?
The cost varies greatly depending on the severity of the problem and the solutions chosen. Simple fixes like gutter cleaning and downspout extensions might cost less than $100. Installing a french drain can range from $500 to $3,000 or more, depending on the size and complexity. Grading can also add significant costs. Permeable pavers are a larger investment, often costing $15-$30 per square foot or more.
Q2: Can I fix yard flooding myself?
Yes, many minor flooding issues can be addressed with DIY solutions like cleaning gutters, extending downspouts, and basic soil aeration. However, for more significant problems involving grading, french drains, or complex landscaping changes, it’s often best to consult with or hire a professional landscaper or drainage specialist.
Q3: What is the best drainage solution for clay soil?
Clay soil is notorious for poor drainage. For clay soil, combining soil aeration, adding compost to improve soil structure, implementing grading yard to direct surface water, and installing drainage solutions like french drains or rain gardens are most effective.
Q4: How do I know if I need a sump pump?
You likely need a sump pump if your basement or crawl space experiences regular flooding, if you notice dampness or mold, or if your property is in an area prone to high water tables. It’s a proactive measure for homes in flood-prone areas.
Q5: Who is responsible for yard flooding if it comes from a neighbor?
This can be a complex legal issue. Generally, property owners are responsible for managing water on their own land and not causing damage to their neighbors. If your neighbor’s actions (or lack thereof) are directly causing your flooding, you may need to communicate with them or seek legal advice. Many municipalities also have regulations regarding stormwater management and property boundaries.
Conclusion
Stopping your yard from flooding requires a proactive approach to water management. By carefully assessing the causes of flooding and implementing the appropriate drainage solutions – from simple gutter downspout extensions and soil aeration to more involved projects like grading yard, french drain installation, rain garden creation, or permeable pavers – you can transform a waterlogged yard into a dry, healthy, and beautiful outdoor space. Don’t let standing water ruin your landscape; take control with these proven strategies.